Adding a New User
If the Benefit Administrator is someone outside of the company or someone not enrolled in benefits with the company, you will need to create them as a user before setting them up as an administrator.
If the new administrator is an employee of the company, you do not need to add them as a new user and can skip to the next step (Updating a User to Benefit Administrator).
-
Log in to your EverythingBenefits platform
- In the Upper Left Search Bar, type "All Users" and select the All Users Path. You can also navigate here using the Menu and selecting Configuration > Users > All Users.
- Click the Add button at the bottom of the screen to add a new user.
Updating a User to Benefit Administrator Security
-
Log in to your EverythingBenefits platform
- Click on the Configuration link from the Quick Links widget, or navigate from the Menu > Benefits > Configuration > Configuration.
- Find the Benefits Administrator widget, and click the Add button to add your Benefits Administrator.
- Type the user's name in the "User" box.
- If the employee’s name pops up in the box, and the email address listed under that employee name is their work email address, continue to the next step.
- If the employee’s name does not pop up, or pops up with their personal email address, you will need to revisit the Adding a New User instructions above.
- Choose the Employment Group. Select All Employments if this user should have access to everyone.
- Click the Save button.
- Click on the User's name that should now be a hyperlink.
- Go to the Security widget and click on the Add button to add a row for Everything (System Admin) security. This user will now either have one or two Security Roles:
- Employee Self Service: if they are also an employee of the company
- Everything (System Admin): is the role you just added.
- Click the Save button.
Granting this User Access to Employees
-
In the Upper Left Search Bar, type "Employment Groups" and select the option from the drop-down. You can also navigate here using the Menu and selecting Configuration > Organization > Employment Groups.
- Click the edit icon to edit the correct group. Choose All Employments if this user should have access to everyone.
- Click the Add User button at the bottom of the screen.
- Choose the user, mark the Can Edit checkbox, and click the Save button.
Granting this User Access to Other Administrators (Optional)
If this user should also maintain or add additional Benefits Administrators, they will need access to the User Group.
-
In the Upper Left Search Bar, type "User Groups" and select the option from the drop-down. You can also navigate here using the Menu and selecting Configuration > Users > User Groups.
- Click the edit icon to edit the correct group. Choose All Users if this user should have access to everyone.
- Click the Add User button at the bottom of the screen.
- Choose the user, mark the Can Edit checkbox, and click the Save button.
Updating Dashboards
- To update this user's dashboard, start by navigating to your own dashboard. This will be the landing page when you login. If you are already logged in, navigate to your dashboard by clicking the little home icon under the hamburger menu.
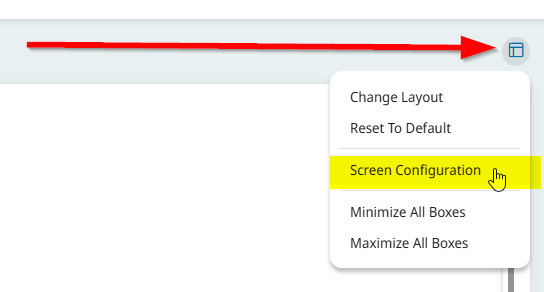
- Click on the Screen Configuration icon on the top right of your dashboard and choose Screen Configuration.
- Click Export. This will download a zip file that you will need to provide to this new user.
- When the new user logs in, they will need to go to the same Screen Configuration pop-up, choose Import, and then import the zip file that you previously downloaded.