Vendor & Deduction Code Setup
Before you start the Deduction Wizard, you must verify that your vendor and deduction code type are set up in the system.
- Vendor
- Navigate to Settings > Payroll Setup > Vendors and locate the Vendor. If the Vendor is not set up, please review our Knowledgebase Article: Adding a New Vendor
- Deduction Code
- Navigate to Settings > Payroll Setup > Deduction Codes to review your codes, or click the Add New Deduction code button on the top.
- Also, review the training under My Info > Help > Learning Center and search for the Course: Company Deduction Codes for additional information on adding or reviewing deduction codes.
Using the Involuntary Deduction Wizard
On the Employee Information screens, go to the Payroll tab > Deductions Widget and select the three dots for Actions on the right. Choose the Involuntary Deduction Wizard to start.

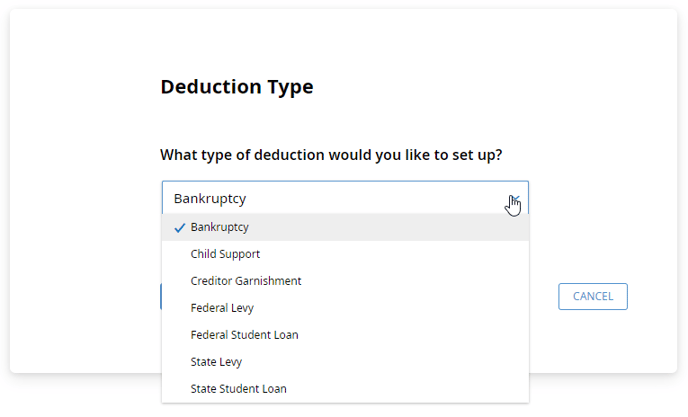
In the Deduction Type section, click the drop-down arrow, select the deduction type you want, and hit Next. Each option has different questions and calculation methods, and your drop-down will only show the deduction types for which you have already added codes. Please look above for instructions on adding new deduction codes if you don't see the needed option.
Complete the fields for the deduction type you selected. The required items will be marked with an asterisk based on the standard deduction.
Here are some examples of items you will need to fill in:
- Start Date: when you want the deduction to start. If you choose today's date, the system will start on the next payroll.
- Obligation Date: the date the court ordered the obligation.
- Case number: please use the one listed in “include with remittance” sections
- Deduction code
- Amount per payroll
- Vendor: If you leave the vendor field blank, the system will not generate a payment with payroll (see above for information regarding vendors)
- FIPS code
Then click Next.
The summary details will appear. Click Previous to change any details, click Cancel to exit the employee's deduction wizard, or click Finish to finalize the setup.
When you see your Success Message, click the link to upload any supporting documentation you want to save. Also, click the View Deduction link to review the deduction setup and ensure all fields are filled in correctly.
Tips & Tricks
- Reviewing the Deduction
- After completing the wizard, please always review the deduction setup to ensure all fields are filled in correctly.
- If you do not see a setting available that is listed on the garnishment paperwork, you may have chosen the wrong garnishment type at the beginning of the wizard.
- Send yourself a payroll alert to review that the deductions are working correctly on your next payroll.
- Reviewing Earnings and Deductions Lists
- If your garnishment type has earnings or deduction list options, please review the lists to ensure that all the correct earnings/deductions are included.
- Go to Settings > Payroll Setup > Lists to view the different list types and setup.
- Creditor Garnishments
- Use the work state for creditor garnishment limits, unless the state does not have limits. If the state does not have limits, the system will display a warning to explain that the court order statnd will be use.
- For example, if the work state is Texas, the court order Texas state limits will be enforced.
- Child Support
- A Federal Levy has a higher priority than a child support deduction if it was issued before the child support order.
- Federal Levy
- For the current year, you need to identify whether the levy is based on exemptions or dependents. This applies to a levy issued only in the current year.
- In the Involuntary Deduction Wizard, you can identify the existing deductions that have priority over the levy, if applicable.
- State Levy
- In the Involuntary Deduction Wizard you can determine whether the system should follow the issue state or work state to determine the limits.
- For a State Levy, you probably will override the maximum percent, as some states allow up to 100 percent to be withheld. However, the order could specify a lower amount.
- Some state levies refer to debt that is not related to taxes. The distinguishing factor is that debt unrelated to taxes will show a minimum amount due to the employee (e.g., $217.50 per work week). If this is the case, please ensure these options are marked as YES.
- Should the court order state be used for limits? YES
- Is this a Non-Tax Debt Order? YES